
Hope everyone will come across this scenario when trying to access some elements in a web application on your mobile device/desktop and not being able to find certain elements because of an overlapping image or text, here comes Visual testing. Your functional test case might get passed but it gets failed in visual testing and the visual errors will have a severe impact on user traffic to your application.
Visual testing not just make sure that your application looks good but it also detects differentiation between baseline images and screenshots taken during testing.
What is Visual Regression Testing?
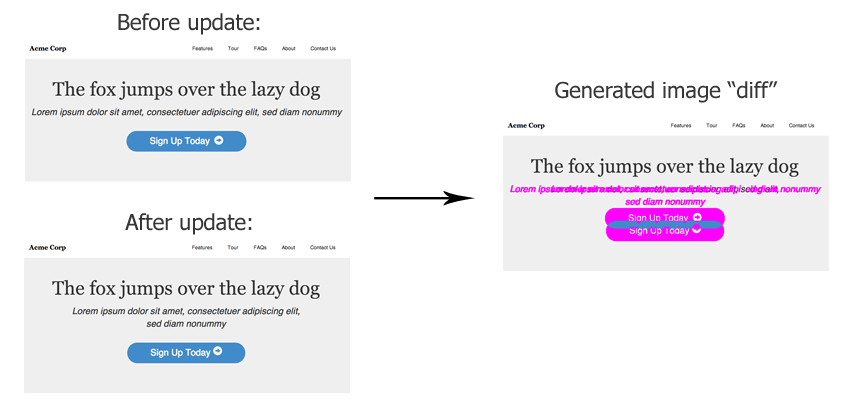
Visual regression testing is a way of comparing screenshots of the site with the baseline screenshots. These screenshots are often taken before and after you update your front-end code during code deployment. As the name suggests, the objective of visual testing is to find visual errors. The errors like misalignment of objects, font, layout and rendering issues. We can achieve the visual regression testing using webdriver.io.
What is Webdriver.io?
WebdriverIO is an open source testing utility for nodejs. It helps to write super easy selenium tests with Javascript in BDD or TDD test framework. It basically sends requests to a Selenium server via the WebDriver Protocol and handles its response. Visual Regression is one of the services provided by WebdriverIO API.
Installation Steps
- Reference: http://webdriver.io/guide.html and http://webdriver.io/guide/services/visual-regression.html
- Download and Install Java.
- Download and Install node.js – https://nodejs.org/en/ – download the stable version and select based on your windows version.
- Set up the selenium web driver. Download the stable version of selenium jar from http://seleniumhq.org/ page.
- Go to https://sites.google.com/a/chromium.org/chromedriver/downloads and download the chrome driver and place it inside the selenium jar folder and set the path in the environment variable.
- Create a simple test folder Wdio-visual-regression-service. Go to the created folder in command prompt
- Run the following command in your command prompt npm i -s webdriverio wdio-visual-regression-service
- Once all the files downloaded run the npm test command.
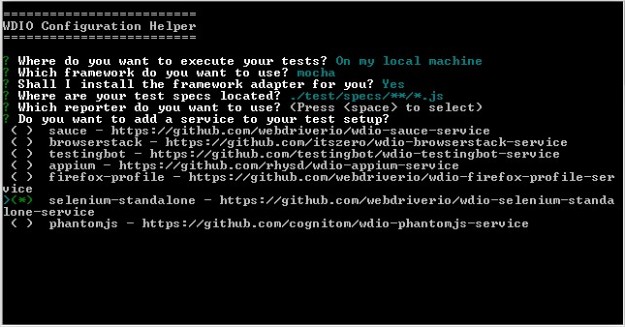
- A question interface pops up(Attached the screenshot for your reference). It will help to create the config file easy and fast also add the Visual-regression service in it.
- Once all the steps are completed there will be a Javascript file with the name as wdio.conf in “Wdio-visual-regression-service” folder, open it.
- Add the below code at the top of your wdio.conf file.
var VisualRegressionCompare = require(‘wdio-visual-regression-service/compare’);
function getScreenshotName(basePath) {
return function(context) {
var type = context.type;
var testName = context.test.title;
var browserVersion = parseInt(context.browser.version, 10);
var browserName = context.browser.name;
var browserViewport = context.meta.viewport;
var browserWidth = browserViewport.width;
var browserHeight = browserViewport.height;
return path.join(basePath, `${testName}_${type}_${browserName}_v${browserVersion}_${browserWidth}x${browserHeight}.png`);
};
}
- Add the below code under service section in your conf file.
compare: new VisualRegressionCompare.LocalCompare({
referenceName: getScreenshotName(path.join(process.cwd(), ‘screenshots/reference’)),
screenshotName: getScreenshotName(path.join(process.cwd(), ‘screenshots/screen’)),
diffName: getScreenshotName(path.join(process.cwd(), ‘screenshots/diff’)),
misMatchTolerance: 0.01,
}),
viewportChangePause: 300,
viewports: [{ width: 320, height: 480 }, { width: 480, height: 320 }, { width: 1024, height: 768 }],
orientations: [‘landscape’, ‘portrait’],
},
- Save the config file.
- Create folder ./test/specs in Wdio-visual-regression-service folder.
- Create your first test and past it in specs folder.
The Default reporter will be the dot. If you need any additional reports, refer the reporter section http://webdriver.io/guide/reporters/dot.html and install the required reporters based on your needs and configure in wdio.conf.js.
Sample Code
beforeEach(function(){
browser.url(‘http://webdriver.io/’);
});
it(‘should looks good’,function(){
browser.checkElement(‘.mainnav’);
});
});
Command Line Execution & Report Output
Open the command prompt and run the command:
npm test
Now your script will start getting executed and this will create the baseline screenshots for your test now change the URL of your code to http://webdriver.io/contribute.html and run the code once again.
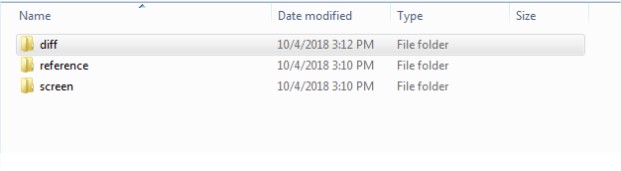
Webdriver will compare the correct element with the already existing baseline screenshots and it will highlight the UI changes in diff folder under “Screenshots”. The below snapshot shows this:
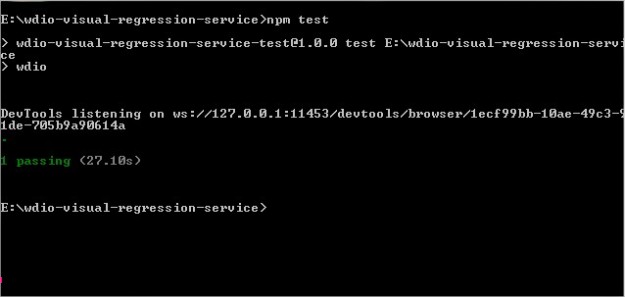
The below snapshot shows the command lined dot report output.
The Junit.xml report can be imported into excel. The below snapshot shows the imported report.

The implementation of Visual regression testing by using webdriver.io in QA cycle will decrease the manual UI regression testing time and cost. Spending time on implementing the automated visual UI testing in your releases will give you good test coverage and excellent ROI.
References
http://webdriver.io/guide/services/visual-regression.html
Image source – https://learn.visualregressiontesting.com/
[dckap_cta bg=”https://www.qatouch.com/wp-content/uploads/2019/02/CTA.png” label=”Sign up for free” h4=”Smarter Test Management For QA Teams” p=”Free up to 300 Test Cases. No credit card required” link=”https://register.qatouch.com/” target=”_blank”]