Mobile applications have become an essential part of our daily lives, making mobile app testing crucial for delivering high-quality applications. Appium is one of the most popular open-source automation tools for testing mobile applications. It supports testing for both Android and iOS platforms and enables automation across native, hybrid, and mobile web applications.
In this tutorial, we will cover everything you need to know about Appium, including its features, setup process, and how to create your first Appium test.
What is Appium?
 Appium is an open-source mobile automation testing framework that enables the automation of native, hybrid, and mobile web applications on both Android and iOS platforms. It provides a flexible testing approach by allowing testers to write scripts in multiple programming languages, including Java, Python, and JavaScript.
What Makes Appium So Popular?
 Appium has gained widespread adoption in the mobile testing community as it simplifies mobile app automation by providing a single framework that works across different platforms and programming languages. Here are the key reasons why Appium is a preferred choice among testers and developers:
1. Cross-Platform Support
One of Appium’s standout features is its ability to run tests on both Android and iOS platforms without requiring significant modifications to test scripts. This cross-platform capability helps organizations streamline their mobile testing efforts by maintaining a single codebase for both platforms, reducing redundancy and effort.
- With Appium, you can write a test once and execute it on multiple devices running different operating systems.
- It eliminates the need to learn separate testing frameworks for Android and iOS, improving test reusability.
- It supports native, hybrid, and web applications, allowing testers to automate various types of mobile applications seamlessly.
2. Multiple Language Support
Unlike other mobile testing frameworks that require writing test scripts in a specific language, Appium is highly flexible when it comes to programming language support. It allows testers to write scripts using:
- Java
- Python
- JavaScript
- C#
- Ruby
- PHP
This multi-language compatibility is made possible through the WebDriver API, which Appium is built upon. Testers and developers can choose a programming language they are comfortable with and integrate Appium into existing automation frameworks, such as TestNG, JUnit, PyTest, Cucumber, or Mocha.
3. No App Modification Required
One of Appium’s biggest advantages is that it does not require modifying the application under test. Many mobile automation tools demand embedding additional SDKs or recompiling the app, which can interfere with its original functionality. However, Appium follows a “no-intrusion” approach, meaning:
- Testers can automate apps in their production-ready state.
- There is no need to recompile or modify the app just for testing.
- This makes it easier to work with third-party apps or apps where access to source code is limited.
Since Appium interacts with apps using the same automation APIs that a human would, it accurately mimics real-world usage scenarios, leading to more reliable and authentic test results.
4. Compatibility with Real Devices & Emulators
Appium supports testing on a variety of environments, giving teams flexibility in how they execute their tests:
- Run tests on physical smartphones and tablets to replicate real-world conditions.
- Test on virtual devices to save costs and enable faster debugging.
- Use platforms like Sauce Labs, BrowserStack, and AWS Device Farm to run tests on real devices hosted remotely.
Appium Architecture: How It Works
 To understand how Appium automates mobile applications, it’s essential to break down its architecture and key components. Appium follows a client-server architecture, where the test scripts interact with an Appium server, which then communicates with the mobile device.
Appium Server
At the heart of Appium is the Appium Server, which acts as an intermediary between test scripts and mobile devices. The server is built using Node.js and listens for test commands from the client. Once a request is received, the Appium server processes it and forwards it to the appropriate automation framework (UIAutomator for Android or XCUITest for iOS).
Key Responsibilities of the Appium Server:
- Receives and interprets test commands from the client.
- Establishes a session with the mobile device/emulator.
- Uses platform-specific automation frameworks to execute actions on the app.
- Sends responses back to the test script, indicating success, failure, or errors.
Appium Client Libraries
Appium supports multiple programming languages, such as Java, Python, JavaScript, Ruby, C#, and PHP, making it highly flexible for developers and testers. To achieve this, Appium provides client libraries that allow writing test scripts in the preferred language while still interacting with the Appium server.
How It Works:
- The test script (written using Selenium WebDriver API) sends automation commands to the Appium server.
- These commands are formatted as HTTP requests using the Mobile JSON Wire Protocol.
- The Appium server translates these commands and interacts with the device accordingly.
Mobile JSON Wire Protocol
The Mobile JSON Wire Protocol (MJWP) is the communication standard that allows test scripts to send commands to the Appium server. It extends the standard Selenium WebDriver JSON Wire Protocol to include mobile-specific actions like tapping, swiping, and accessing device sensors.
Process Flow:
- The test script sends an HTTP request (in JSON format) to the Appium server.
- The Appium server interprets the request and forwards it to the appropriate driver (UIAutomator/XCUITest).
- The driver executes the action on the mobile device and sends the response back to the server.
- The Appium server relays the response to the test script.
UIAutomator (Android) & XCUITest (iOS)
Appium uses platform-specific automation drivers to interact with the mobile application and execute test commands:
- UIAutomator (for Android) – A framework developed by Google that allows automation of Android apps starting from Android 4.3 (API level 18) and above. It provides advanced capabilities like view hierarchy inspection and interaction with multiple apps.
- XCUITest (for iOS) – Developed by Apple, XCUITest is used to automate iOS apps. It is fast and reliable but requires tests to be executed on macOS with Xcode installed.
How Drivers Work in Appium:
- When a test command (e.g., tapping a button) is sent, the Appium server forwards it to the corresponding driver.
- The driver interacts with the mobile app’s UI elements and acts.
- The result (success/failure) is sent back to the Appium server and then returned to the test script.
Writing Your First Appium Test Script
Let us now understand how to write an Appium test script using Java with TestNG. This will cover setting up dependencies, configuring desired capabilities, launching the app, and interacting with UI elements.
Setting Up Dependencies
Before writing an Appium test script, ensure you have the required dependencies in your pom.xml file (if using Maven).
Maven Dependency for Appium Java Client
Add the following dependency to your pom.xml:
<dependency>
<groupId>io.appium</groupId>
<artifactId>java-client</artifactId>
<version>8.1.1</version>
</dependency>
Sample Appium Test Script (Java)
Below is a simple Java test script to launch an Android app and interact with a button:
import io.appium.java_client.AppiumDriver;
import io.appium.java_client.MobileElement;
import io.appium.java_client.android.AndroidDriver;
import org.openqa.selenium.remote.DesiredCapabilities;
import java.net.MalformedURLException;
import java.net.URL;
public class AppiumTest {
public static void main(String[] args) throws MalformedURLException {
DesiredCapabilities caps = new DesiredCapabilities();
caps.setCapability(“platformName”, “Android”);
caps.setCapability(“deviceName”, “Pixel_4_Emulator”);
caps.setCapability(“app”, “/path/to/app.apk”);
caps.setCapability(“automationName”, “UIAutomator2”);
AppiumDriver<MobileElement> driver = new AndroidDriver<>(new URL(“http://127.0.0.1:4723/wd/hub”), caps);
// Example: Clicking a button
MobileElement button = driver.findElementById(“com.example:id/button”);
button.click();
driver.quit();
}
Why Run Appium Tests on Real Devices?
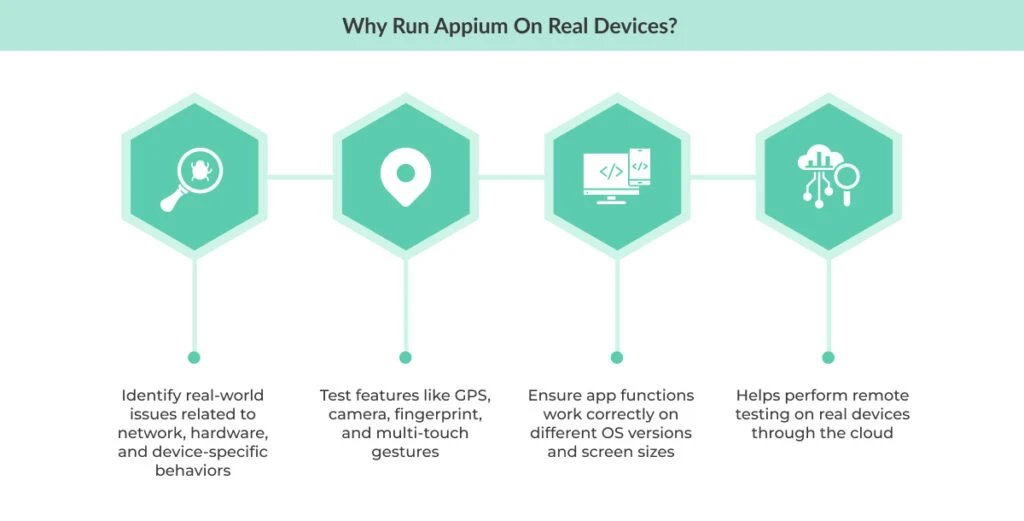 Running Appium tests on real devices is always beneficial. Here are some of the reasons, why:
Accurate Performance Testing
Running tests on real devices helps you identify real-world issues that simulators or emulators may not replicate. This includes network fluctuations, hardware limitations, and device-specific behaviors that can impact app performance in the field.
Better Gesture and Sensor Interaction
Real devices provide the most accurate testing for features that rely on sensors and gestures, such as GPS, cameras, fingerprint scanners, and multi-touch interactions. Simulators often fail to replicate the true behavior of these features, leading to inaccurate results.
Improved Compatibility Testing
Testing on real devices ensures that your app functions correctly across different manufacturers, OS versions, and screen sizes. It helps verify compatibility with the wide range of devices your users are likely to have.
Cloud-Based Real Device Testing
With tools like BrowserStack and Sauce Labs, you can perform remote testing on real devices through the cloud. This enables you to test your app on various devices without the need to own and maintain an extensive physical device fleet.
Appium on Android Devices
Appium provides a powerful framework for automating tests on Android devices, whether using physical devices or emulators. Let us see how Appium interacts with Android applications here:
1. Installing Appium and Required Dependencies
Before you can start running tests, you need to install a few essential tools to ensure Appium works seamlessly with Android:
- Appium Server: Appium requires a server to execute tests, which can be installed either via Node.js or Appium Desktop.
- Java Development Kit (JDK): Since Appium runs on Java, the JDK is required to run Android tests.
- Android SDK & Command Line Tools: These tools provide the necessary platform tools like ADB (Android Debug Bridge), which is required to interact with Android devices.
- UIAutomator2 Driver: This is Appium’s preferred automation engine for Android testing.
To install Appium via npm, use the following command:
npm install -g appium
appium -v # Verify installation
Make sure that you have the JDK and Android SDK installed and configured correctly before proceeding with any tests.
2. Setting Up an Android Virtual Device (AVD) or Connecting a Real Device
To run tests, you need either an Android emulator (AVD) or a physical Android device.
- For an emulator: You can configure an Android Virtual Device (AVD) using Android Studio. Make sure you select a device and a suitable Android version for testing.
- For a physical device: If you plan to use a real device, ensure USB Debugging is enabled under Developer Options on the Android device. Once that’s done, connect the device to your computer and verify the connection using the following command:
adb devices
This should list the connected devices, ensuring that everything is set up correctly.
3. Configuring Desired Capabilities for an Android Test
Desired capabilities define the environment for your test, including the platform, device, and app to test. These capabilities are passed to Appium when you initiate a test.
Here’s an example of configuring desired capabilities for an Android test:
{
“platformName”: “Android”,
“deviceName”: “Pixel_4_Emulator”,
“app”: “path/to/android-app.apk”,
“automationName”: “UIAutomator2”
}
- platformName: Specifies the platform, in this case, Android.
- deviceName: The name of the device, whether it’s an emulator or a real device.
- app: Path to the APK file you want to test.
- automationName: Specifies the automation engine, which is UIAutomator2 for Android.
4. Running a Basic Appium Test Script for Android
After setting up the desired capabilities, you can now run a simple Appium test on an Android device. Here’s an example Java-based test script using Appium’s Java Client:
import io.appium.java_client.MobileElement;
import io.appium.java_client.android.AndroidDriver;
import org.openqa.selenium.remote.DesiredCapabilities;
import java.net.MalformedURLException;
import java.net.URL;
public class AndroidTest {
public static void main(String[] args) throws MalformedURLException {
DesiredCapabilities caps = new DesiredCapabilities();
caps.setCapability(“platformName”, “Android”);
caps.setCapability(“deviceName”, “Pixel_4_Emulator”);
caps.setCapability(“app”, “/path/to/android-app.apk”);
caps.setCapability(“automationName”, “UIAutomator2”);
AndroidDriver<MobileElement> driver = new AndroidDriver<>(
new URL(“http://127.0.0.1:4723/wd/hub”), caps);
// Example: Find and click a button
MobileElement button = driver.findElementById(“com.example:id/button”);
button.click();
driver.quit();
}
}
In this example, we configure the DesiredCapabilities, start the AndroidDriver, and then interact with an element in the app (in this case, a button). After the interaction, the driver is closed with driver.quit().
Appium on iOS Devices
Let us now understand how to configure Appium for iOS testing, from setup to running test scripts.
1. Installing Xcode, Appium Server, and Required Dependencies
To run Appium tests on iOS, you’ll need to install a few essential tools:
- Xcode: Apple’s development environment, required for iOS automation.
- Carthage: A dependency manager to build WebDriverAgent (WDA).
- Appium Server: Installed via npm to execute tests.
- XCUITest Driver: Apple’s native automation framework for iOS.
To install Carthage, run the following command:
brew install carthage
2. Setting Up WebDriverAgent for iOS Automation
WebDriverAgent (WDA) is essential for running tests on iOS devices. Here’s how to set it up:
- Navigate to the Appium directory:
cd /usr/local/lib/node_modules/appium/node_modules/appium-xcuitest-driver/WebDriverAgent
- Build the WebDriverAgent:
mkdir -p Resources/WebDriverAgent.bundle
xcodebuild -project WebDriverAgent.xcodeproj \
-scheme WebDriverAgentRunner \
-destination ‘platform=iOS Simulator,name=iPhone 13’ \
build-for-testing
3. Configuring Desired Capabilities for iOS
Desired capabilities define the platform and app details for testing. Here’s an example for configuring iOS:
{
“platformName”: “iOS”,
“deviceName”: “iPhone 13”,
“app”: “path/to/ios-app.app”,
“automationName”: “XCUITest”
}
- platformName: Specifies iOS as the platform.
- deviceName: Name of the device (emulator or physical device).
- app: Path to the iOS app you want to test.
- automationName: Use XCUITest for iOS automation.
4. Writing and Executing a Sample Appium Test Script for iOS
Here’s a simple Java test script for automating iOS with Appium:
import io.appium.java_client.MobileElement;
import io.appium.java_client.ios.IOSDriver;
import org.openqa.selenium.remote.DesiredCapabilities;
import java.net.MalformedURLException;
import java.net.URL;
public class iOSTest {
public static void main(String[] args) throws MalformedURLException {
DesiredCapabilities caps = new DesiredCapabilities();
caps.setCapability(“platformName”, “iOS”);
caps.setCapability(“deviceName”, “iPhone 13”);
caps.setCapability(“app”, “/path/to/ios-app.app”);
caps.setCapability(“automationName”, “XCUITest”);
IOSDriver<MobileElement> driver = new IOSDriver<>(
new URL(“http://127.0.0.1:4723/wd/hub”), caps);
// Example: Interact with a UI element
MobileElement textField = driver.findElementByAccessibilityId(“usernameField”);
textField.sendKeys(“testuser”);
driver.quit();
}
}
In this script, we configure the DesiredCapabilities, initialize the IOSDriver, and interact with a UI element (a text field). Finally, the driver is closed using driver.quit(), completing the test.
Differences Between Appium 2.0 vs Appium 1.0
Appium 2.0 introduces several improvements and changes over Appium 1.0, aimed at enhancing flexibility, modularity, and support for newer technologies. Below are the key differences between Appium 1.0 and Appium 2.0:
Feature Comparison
| Feature | Appium 1.0 | Appium 2.0 |
| Plugin Support | Not available | Yes, supports plugins to extend functionality |
| Driver Management | Built-in drivers included | Drivers need to be installed separately |
| Performance | Slower, less optimized | Faster, more stable with better resource handling |
| New API Structure | No, monolithic structure | Yes, modular API with better flexibility |
1. Plugin Support
- Appium 1.0: One of the key limitations of Appium 1.0 was the lack of plugin support. All features were hardcoded into the core, making it less flexible to extend functionality.
- Appium 2.0: With Appium 2.0, plugin support has been introduced. Users can now install and manage plugins that extend Appium’s capabilities. This allows developers to customize their test environment and integrate additional features like logging, reporting, and other test utilities.
2. Driver Management
- Appium 1.0: In Appium 1.0, all drivers (e.g., Android, iOS, Windows) were built-in and bundled with the Appium server. This was convenient but led to large package sizes and made the server heavier.
- Appium 2.0: Driver management has been completely revamped in Appium 2.0. Drivers are now external, meaning users can install only the drivers they need for specific platforms (Android, iOS, Web, etc.). This reduces the server’s footprint and allows for more flexibility in choosing the drivers that best suit your testing needs.
3. Performance
- Appium 1.0: Appium 1.0, while functional, had performance issues due to its monolithic design and lack of optimization for specific use cases. As a result, test execution could be slower and less stable, especially on larger projects.
- Appium 2.0: Appium 2.0 has undergone significant improvements in performance. The new modular architecture enhances stability and speeds up the execution of tests by reducing resource consumption and enabling better parallel execution of tests.
4. New API Structure
- Appium 1.0: Appium 1.0 followed a monolithic API structure, which made it harder to extend and customize. As the framework grew, it became increasingly complex.
- Appium 2.0: Appium 2.0 introduces a modular API structure. This allows developers to import only the features and drivers they need, simplifying the codebase and making it easier to work with. The modularity improves extensibility and maintainability, providing a more scalable solution for larger projects.
How to Upgrade from Appium 1.x to Appium 2.0
Upgrading from Appium 1.x to 2.0 is a straightforward process, but it involves a few steps to ensure compatibility and functionality. Here’s how you can upgrade:
- Uninstall Appium 1.x: To avoid conflicts, you should first uninstall Appium 1.x if it’s already installed
npm uninstall -g appium
- Install Appium 2.0: Appium 2.0 can be installed via npm:
npm install -g appium@next
- Install Required Drivers: Since drivers are now external in Appium 2.0, you need to install them separately. For example, to install the Android and iOS drivers, use the following commands:
appium driver install uiautomator2 # Install Android driver
appium driver install xcuitest # Install iOS driver
- Verify Installation: After upgrading, verify that Appium 2.0 and the necessary drivers are installed correctly:
appium -v # To check Appium version
appium driver list # To see the list of installed drivers
Installing Drivers Separately in Appium 2.0
In Appium 2.0, the driver installation process is separate, allowing you to install only the drivers you need. Here’s how to install and manage drivers:
- List Available Drivers: You can list all the available drivers by running:
appium driver list
- Install Specific Drivers: To install a driver, you can use the following command:
appium driver install <driver-name>
For example, to install the Android driver (UIAutomator2):
appium driver install uiautomator2
- 3. Uninstall Drivers: If you no longer need a driver, you can uninstall it by using:
appium driver uninstall <driver-name>
- Update Drivers: To update installed drivers to the latest version, you can run:
appium driver update <driver-name>
Common Challenges and How to Overcome Them
Testing with Appium can be challenging at times, but understanding and addressing common issues can help streamline the process.
Element Not Found Errors
Problem: Element not found errors occur when Appium cannot locate the desired UI element on the screen. These errors are typically caused by incorrect or stale locators.
Solution:
- Using Appium Inspector: Appium Inspector is a great tool for inspecting the app’s UI and finding the correct locators. By using the Inspector, you can visually explore the app and interact with elements to determine the best locators.
- Different Locator Strategies: Use a variety of locator strategies (e.g., XPath, CSS selectors, ID, Name, Class Name) to find elements. Sometimes switching between different strategies can resolve the issue, especially in dynamic apps where element properties might change.
Session Timeout Issues
Problem: Session timeout errors happen when the Appium server cannot establish or maintain a session with the device or emulator, often due to connection problems or long initialization times.
Solution:
- Adjusting Timeout Settings: Increase the session and connection timeouts in your Appium configuration. You can adjust these settings in your test scripts to give the server more time to initialize the session:
capabilities.setCapability(“newCommandTimeout”, 300);
capabilities.setCapability(“sessionTimeout”, 300);
This ensures that Appium waits for a longer duration before the session times out.
Parallel Execution Problems
Problem: Running tests in parallel can be difficult, especially if tests are not isolated or there are issues with device connections.
Solution:
- Using Selenium Grid for Multiple Devices: Set up a Selenium Grid or use cloud-based solutions like Sauce Labs or BrowserStack to manage multiple devices in parallel. Appium supports Selenium Grid to handle parallel test execution across multiple devices, ensuring better scalability and faster test execution.
Best Practices for Effective Appium Testing
To ensure efficient and effective Appium testing, following best practices can help you achieve better test coverage and avoid common pitfalls.
Use Page Object Model (POM) for Better Test Structure
POM is a design pattern that helps organize test scripts by creating a class for each page or screen of your application. This improves the reusability, maintainability, and clarity of your test code.
Implement Wait Strategies to Avoid Flaky Tests
Flaky tests are tests that randomly pass or fail due to timing issues. Implement explicit and implicit waits to give elements enough time to appear before interacting with them:
- Explicit Waits: Wait for specific conditions (e.g., visibility of an element).
WebDriverWait wait = new WebDriverWait(driver, 10);
WebElement element = wait.until(ExpectedConditions.visibilityOfElementLocated(By.id(“element_id”)));
- Implicit Waits: Wait for elements globally throughout your tests.
driver.manage().timeouts().implicitlyWait(10, TimeUnit.SECONDS);
Run Tests in Parallel Using TestNG and Appium Grid
To speed up testing, configure TestNG with Appium to run tests in parallel across multiple devices using Appium Grid or a cloud service. This maximizes test coverage and shortens feedback cycles.
Integrate with CI/CD Pipelines (Jenkins, GitHub Actions)
Integrating Appium tests into your Continuous Integration/Continuous Deployment (CI/CD) pipeline helps automate the testing process, ensuring tests are run with every code change. Tools like Jenkins, GitHub Actions, and CircleCI allow you to automate the execution of Appium tests as part of your build process.
Learning Resources for Appium
Mastering Appium requires continuous learning and practice. Here are some valuable resources to help you enhance your Appium skills.
- Official Documentation – Appium.io
- GitHub Repositories – Sample test scripts and frameworks.
- Online Courses – Udemy, Coursera, and Pluralsight.
- Community Forums & Slack Groups – Stack Overflow, Appium Discuss.
Conclusion
Appium is a powerful tool for mobile automation testing, but like any framework, it comes with its own set of challenges. You can achieve reliable and efficient test automation by following best practices, troubleshooting common issues, and utilizing the right resources.
With QA Touch API, you can streamline mobile testing activities throughout the development cycle, from build to deployment. Our test management platform helps you easily achieve a higher level of automation.
Sign up today to streamline your mobile test automation and improve your testing workflow!