Selenium WebDriver is a powerful tool for automating web applications, but dealing with frames and windows can be a bit tricky. Frames and windows are an integral part of modern web applications, allowing developers to create more interactive and dynamic user interfaces.
In this blog, we will explore how to work with frames and window tabs in Selenium WebDriver using Java code examples. We will also focus on some of the important window management techniques using Selenium Webdriver.

Frames in Selenium WebDriver
Frames are like mini web pages within a web page. They are used to divide a single web page into multiple sections, each with its own HTML document. When you want to interact with elements inside a frame, you need to switch the WebDriver’s focus to that frame. Here’s how you can do it in Selenium WebDriver using Java with different options provided by Selenium
Switch to a Frame
Switching to an iframe can be accomplished in three different ways: using index, name or id, and WebElement. Let’s explore all of them with examples. However, it is advisable to avoid using the index method as it may change and introduce additional flakiness to the automation suite
Iframe using an Index
| WebDriver driver = new ChromeDriver(); driver.get(“https://example.com”); // Switch to a frame using its index (0-based) driver.switchTo().frame(0); // Now you can interact with elements inside the frame WebElement elementInFrame = driver.findElement(By.id(“elementId”)); elementInFrame.click(); // Switch back to the default content driver.switchTo().defaultContent(); |
Iframe with NAME or ID
You can also switch to a frame using its name or ID if it has one:
| //Using the ID driver.switchTo().frame(“buttonframe”); //Or using the name instead driver.switchTo().frame(“myframe”); //Now we can click the button driver.findElement(By.tagName(“button”)).click(); // Switch back to the default content driver.switchTo().defaultContent(); |
Iframe using Webelement
The below-mentioned demo website can be used to check the iframe : globalsqa iFrame
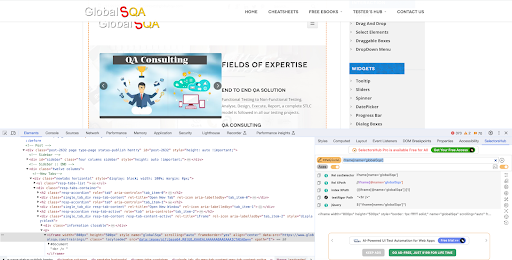
To understand the iframe structure on a page, use the right click and “inspect option”, it will open the developer tools and you should be able to find the iframe under the DOM structure as shown in the below screenshot:
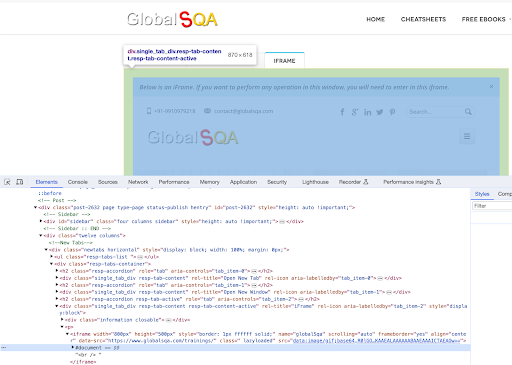
Now if you want to identify this iframe then we can use the name tag as shown below:
 So taking the above example if we want to move to the iframe then we can refer to the below code as a reference:
| //Store the web element WebElement frameIdentification = driver.findElement(By.name(‘globalSqa’)); //Switch to the frame driver.switchTo().frame(iframe); //Now we can click the button driver.findElement(By.tagName(“button”)).click(); |
Switching Back to Default Content
After you have performed the actions you need within the frame, it’s important to switch back to the default content using driver.switchTo().defaultContent() to interact with elements outside the frame.
Recommended Read: Selenium WebDriver Tutorial
Note: Frames are a now deprecated means of building a site layout from multiple documents on the same domain. Chances are, you won’t encounter them unless you’re dealing with a pre-HTML5 web application. Iframes allow you to embed content from a completely different domain and are still commonly used..
Window Tabs in Selenium WebDriver
Modern web applications often use multiple browser tabs or windows for various purposes. Selenium WebDriver allows you to switch between these tabs/windows to perform actions. Here’s how you can work with window tabs:
Use Get window handle
WebDriver does not differentiate between windows and tabs. When your website opens a new tab or window, Selenium enables you to interact with it through a window handle. Each window possesses a distinct identifier that remains constant throughout a single session.
You can get the window handle of the current window by using:
| //save our parent window handle String parentWindow = driver.getWindowHandle(); |
Open a New Window
| WebDriver driver = new ChromeDriver();// Here we are using a demo website link driver.get(“https://www.globalsqa.com/demo-site/frames-and-windows/#Open%20New%20Window“); //click on the link which will open new window driver.findElement(By.xpath(“//a[contains(text(),’Click Here’)]”)).click(); |
Switch to a Window by Handle
Every window has a unique identifier called a “window handle.” You can switch between windows using these handles:
| // Get a list of all window handles Set<String> windowHandles = driver.getWindowHandles(); // Switch to a specific window by its handle for (String handle : windowHandles) { driver.switchTo().window(handle); if (driver.getTitle().equals(“Desired Page Title”)) { break; } } |
Close a Window or Tab
Close the presently active window or tab:
| driver.close(); |
Switch Back to the Original Window
After you’ve finished working with a new window/tab, you can switch back to the original one:
| driver.switchTo().window(parentWindow); |

Generate a new window or tab and perform the switch
In Selenium 4, a new API called ‘NewWindow’ is available, which both creates a new tab or window and automatically switches to it.”
Generates a new window or tab and automatically brings it to the forefront on the screen. There’s no need for manual switching to interact with the new window or tab. In case you have multiple windows or tabs open, apart from the newly created one, you can iterate through the windows or tabs visible to WebDriver and switch to the one that is different from the original.
Note: This feature works with Selenium 4 and later versions.
| // Opens new tab and switches to the new tab driver.switchTo().newWindow(WindowType.TAB); // Opens new window and switches to the new window driver.switchTo().newWindow(WindowType.WINDOW); |
Window Management in Selenium WebDriver
Managing browser windows in Selenium WebDriver is essential for testing web applications effectively. You can control various aspects of the browser window, such as its size, position, and state. In this guide, we will explore window management techniques and provide scenarios for each operation.
Related: Selenium Java BDD Automation
1. Get Window Size
You can fetch the size of the browser window in pixels using the following methods:
You can use driver.manage().window().getSize() to obtain the dimensions of the browser window, which is useful for responsive design testing.
| // Access each dimension individually int width = driver.manage().window().getSize().getWidth(); int height = driver.manage().window().getSize().getHeight(); // Or store the dimensions and query them later Dimension size = driver.manage().window().getSize(); int storedWidth = size.getWidth(); int storedHeight = size.getHeight(); |
2. Set Window Size
To set the window size, use the setSize method:
Use driver.manage().window().setSize(new Dimension(width, height)) to set the window size to specific dimensions, ensuring your web application’s behavior under different viewport sizes.
| // Restore the window and set the size to 1024×768 pixels driver.manage().window().setSize(new Dimension(1024, 768)); |
3. Get Window Position
You can fetch the coordinates of the top-left corner of the browser window using these techniques:
Use driver.manage().window().getPosition() to determine the exact location of the browser window’s top-left corner on the screen.
| // Access each dimension individually int x = driver.manage().window().getPosition().getX(); int y = driver.manage().window().getPosition().getY(); // Or store the dimensions and query them later Point position = driver.manage().window().getPosition(); int storedX = position.getX(); int storedY = position.getY(); |
4. Set Window Position
Move the window to the desired position on the screen:
With driver.manage().window().setPosition(new Point(x, y)), you can move the browser window to a particular position on the screen for targeted testing.
| // Move the window to the top-left corner of the primary monitor driver.manage().window().setPosition(new Point(0, 0)); |
5. Maximize Window
Used to enlarge the window to fill the screen (cross-platform):
This is the most common one in all the Sleeniu projects, driver.manage().window().maximize() used to maximize the browser window, providing a consistent, full-screen testing environment across different browsers.
| driver.manage().window().maximize(); |
6. Minimize Window
Used to minimize the window of the current browsing context:
Use driver.manage().window().minimize() to simulate minimizing the window and test how your web application behaves when minimized.
| driver.manage().window().minimize(); |
7. Fullscreen Window
We can make the window fullscreen, similar to pressing F11 in most of the browsers:
Make use of driver.manage().window().fullscreen(), to enter fullscreen mode, replicating the user’s experience of pressing F11 in most browsers during testing.
| driver.manage().window().fullscreen(); |
These window management techniques help you to interact with browser windows effectively during your Selenium WebDriver tests. Use them as needed to ensure comprehensive test coverage and a seamless user experience.
Conclusion
Working with frames and window tabs in Selenium WebDriver is essential for automating modern web applications. By using the examples explained in this blog, you can effectively switch between frames and windows, which will allow you to interact with elements and perform actions as needed. This knowledge will help you to create more comprehensive and robust test automation scripts for your web applications.
Happy testing!